
So we wanted to make a simple remote control for a robot. We could have used a Spektrum remote, but they are kinda bid and clumsy and only one way comms. So in this tutorial we show how to hook up the nRF24L01 2.4GHz Wireless Transceiver Modules. The remote will have a simple analog 2-axis joystick. The robot will be attached to a Sabertooth 2×32. When the joystick is moved, the motors will turn…
We used the Ardunino Uno R3 on both ends. We have two way communication working in the example, but the return package is just an echo for now. We will be putting sensors on the robot and want that information to make it back to the remote. Ultimately we are probably going to make a single board with the RF, regulators, level shifting, and embedded controller all on one board. We just used bread boards and wire jumpers to hook everything together. The main reason for the bread boards is we used 47ohm resistors in line with any of the 5V logic going to the 3.3V logic of the RF24s. The 3.3V logic from the RF24s is high enough to trigger the 5V logic of the Arduino. (not sure its entirely necessary to do this, but we just wanted to be safe versus sorry). The image below shows our prototype setup. We will post again when we have a full setup.
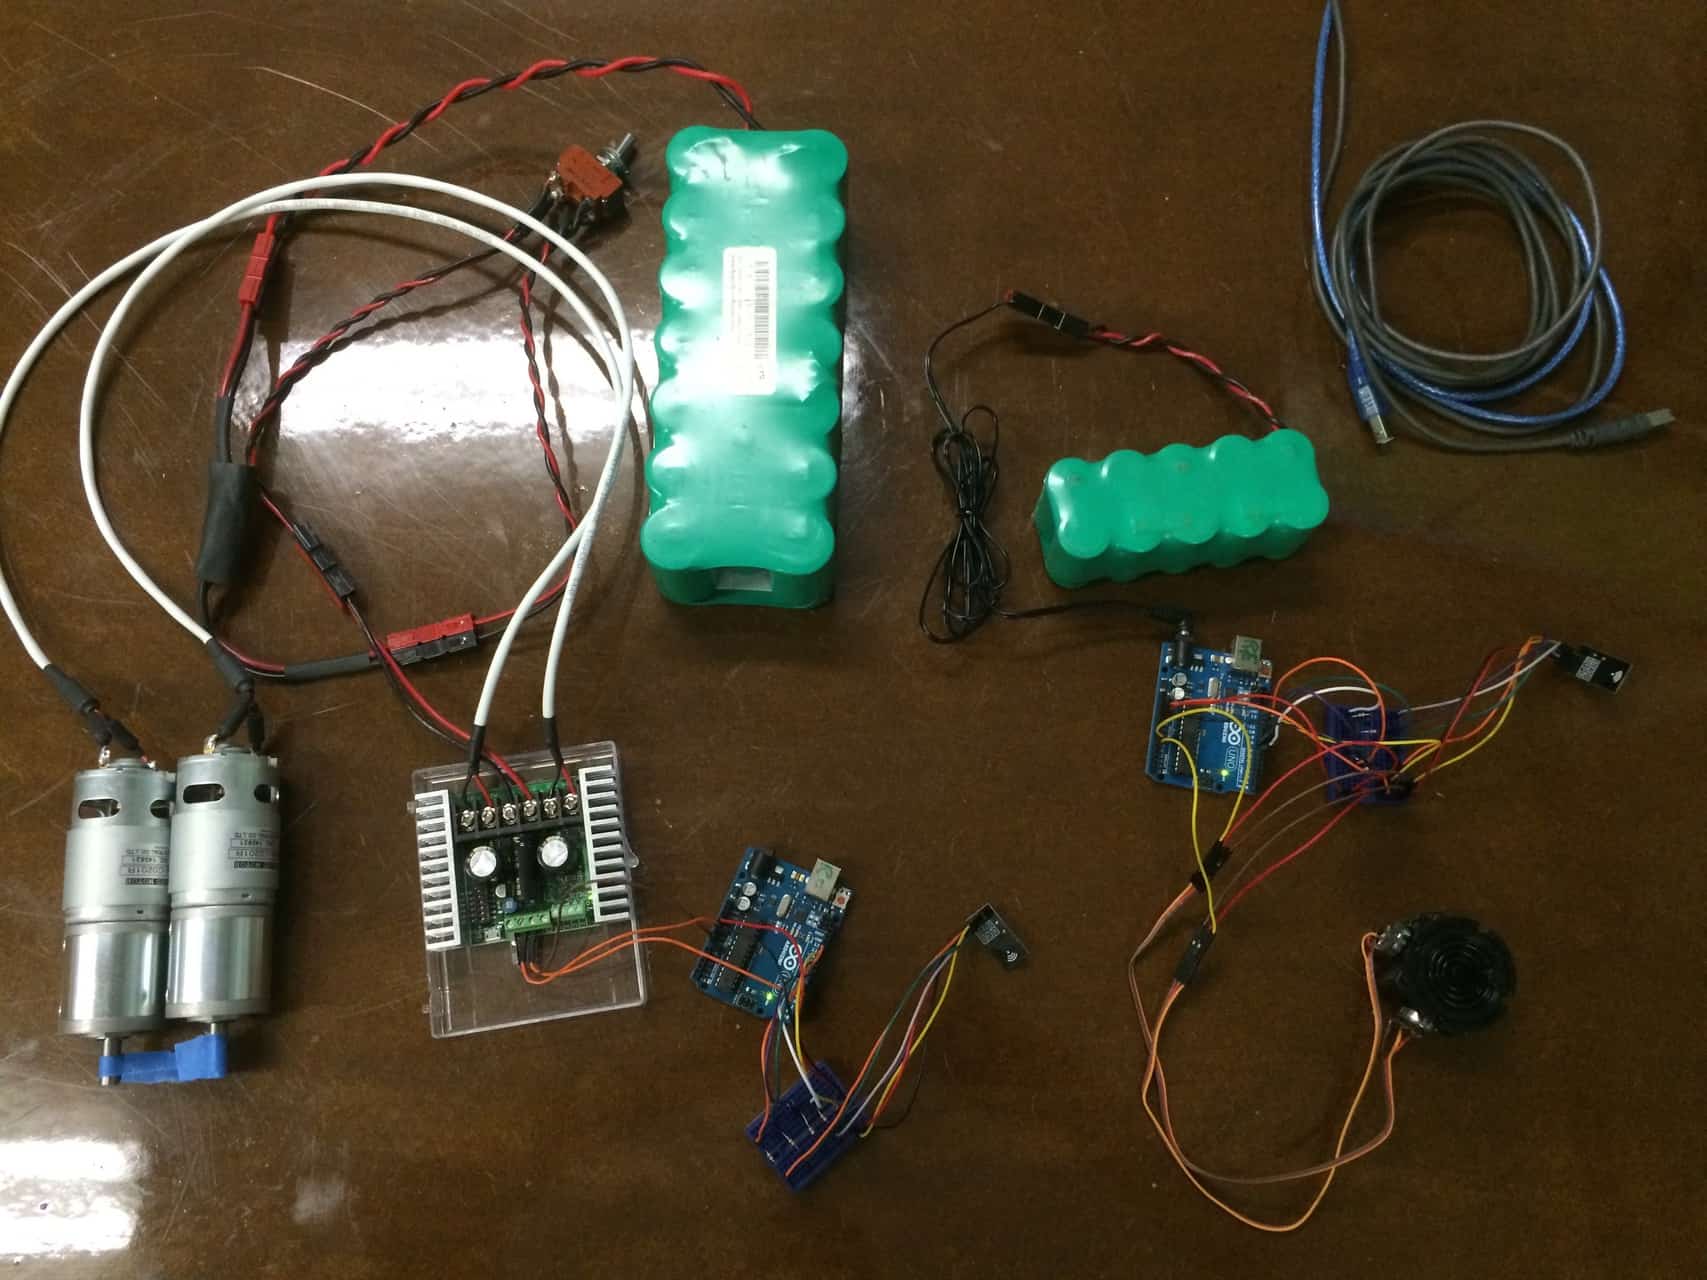
RF Joystick Motor Controller Setup
The Adruino Code for the Remote:
The code below will initialize the RF Transceiver then read the analog channels the joystick is plugged into, then transmit the value to the robot transceiver. It will receive a return packet from the robot’s transceiver.
//  Name		: RF24_remote.ino
//  Author		: Charlie Payne and Jason Traud
//  Notice		: Copyright (c) 2014 SuperDroid Robots
//			: All Rights Reserved
//  Date		: December 17, 2014
//  Arduino		: Arduino Uno R3
//  A Mirf example to use the nRF24L01 and Ardunio to act as a wireless remote.
//  The Remote reads two analogs and transmits them

//  Hardware SPI:
//    MISO -> 12
//    MOSI -> 11
//    SCK -> 13
//
//  Configurable:
//    CE -> 8
//    CSN -> 7

#include
#include
#include
#include

//Generate a packag.  Starte character, 2 analogs and a checksum
long generatePacket ()
{
  unsigned char pre = 0;
  unsigned char analog1 = 0;
  unsigned char analog2 = 0;
  unsigned char packetChecksum;
  unsigned long packet = 0;

  pre = 83; // ASCII "S" start flag

  analog1 = analogRead(A0) >> 2;  //we only need 8 bit resolution
  analog2 = analogRead(A1) >> 2;

  packetChecksum = analog1 + analog2;

  packet = pre;
  packet = (packet << 8) + analog1;
  packet = (packet << 8) + analog2;
  packet = (packet << 8) + packetChecksum; return packet; } void setup() { //Serial.begin(9600); //Set the SPI Driver. Mirf.spi = &MirfHardwareSpi; //Setup pins / SPI. Mirf.init(); //Configure reciving address. Mirf.setRADDR((byte *)"clie1"); //Set payload on client and server must be the same. Mirf.payload = sizeof(unsigned long); //Write channel and payload config then power up reciver Mirf.config(); //Serial.println("Beginning ... "); } void loop() { unsigned long time = millis(); unsigned long txPacket = generatePacket(); unsigned long rxPacket = 0; Mirf.setTADDR((byte *)"serv1"); Mirf.send((byte *)&txPacket); //Serial.print("txPacket: "); //Serial.println(txPacket); while(Mirf.isSending()){ } //Serial.println("Finished sending"); delay(10); while(!Mirf.dataReady()) { //Serial.println("Waiting"); if ( ( millis() - time ) > 1000 )
    {
      //Serial.println("Timeout on response from server!");
      return;
    }
  }

  Mirf.getData((byte *) &rxPacket);

  //Serial.print("rxPacket: ");
  //Serial.println(rxPacket);

  delay(100);
}
The Adruino Code for the Robot:
For the robot code, it ititializes the RF Transceiver and waits for the packets. Once a packet is received, it parses it and controls the motors. Nothing is done with checksums or timeouts to stop the motors, etc., which is needed for a safe system, but this purpose of this code is to simply demonstrate the transceivers.
//  Name		: RF24_robot.ino
//  Author		: Charlie Payne and Jason Traud
//  Notice		: Copyright (c) 2014 SuperDroid Robots
//			: All Rights Reserved
//  Date		: December 17, 2014
//  Arduino		: Arduino Uno R3
//  A Mirf example to use the nRF24L01 and Ardunio to act as a wireless remote.
//  The Robot reads data and controls a sabertooth

//  Hardware SPI:
//    MISO -> 12
//    MOSI -> 11
//    SCK -> 13
//
//  Configurable:
//    CE -> 8
//    CSN -> 7

#include
#include
#include
#include
#include
#include
#include

typedef struct {
 unsigned char prefix;
 unsigned char analog1;
 unsigned char analog2;
 unsigned char packetChecksum;
} remoteToRobot;

SoftwareSerial SWSerial(NOT_A_PIN, 5); // TX on pin 5 (to S1).
Sabertooth ST(128, SWSerial); // Address 128, and use SWSerial as the serial port.

void setup()
{
  SWSerial.begin(9600);
  //Serial.begin(9600);
  //Serial.println("Start");

  //Set the SPI Driver.
  Mirf.spi = &MirfHardwareSpi;

  //Setup pins / SPI.
  Mirf.init();

  //Configure reciving address.
  Mirf.setRADDR((byte *)"serv1");

  //Set payload on client and server must be the same.
  Mirf.payload = sizeof(unsigned long);

  //Write channel and payload config then power up reciver
  Mirf.config();

  //Serial.println("Listening...");
}

void loop()
{
  // A buffer to store the data.
  byte data[Mirf.payload];
  remoteToRobot rxPacket;
  unsigned long tempData = 0;
  int Motor1 = 0;
  int Motor2 = 0;

   // If a packet has been recived.
   // isSending also restores listening mode when it
   // transitions from true to false.

   if(!Mirf.isSending() && Mirf.dataReady())
   {
      //Serial.println("Got packet");

      // Get load the packet into the buffer.
      Mirf.getData(data);

      // Set the send address.
      Mirf.setTADDR((byte *)"clie1");

      //Send the data back
      // This is just a test, send sensor data back, etc.
      Mirf.send(data);

      rxPacket.packetChecksum = data[0];
      rxPacket.analog2 = data[1];
      rxPacket.analog1 = data[2];
      rxPacket.prefix = data[3];

      //Need a check for the checksum and reject if not the same,
      //stop motors if multiple failures or no packets received

      //Serial.print("[Prefix = ");
      //Serial.print(rxPacket.prefix);
      //Serial.print("]");

      //Set Motor Values
      Motor1 = rxPacket.analog1;
      if(Motor1 > 120 && Motor1 < 135) Motor1 = 127; if(Motor1 > 254) Motor1 = 254;
      if(Motor1 < 0) Motor1 = 0; Motor1 = Motor1 - 127; Motor2 = rxPacket.analog2; if(Motor2 > 120 && Motor2 < 135) Motor2=127; if(Motor2 > 254) Motor2 = 254;
      if(Motor2 < 0) Motor2 = 0;
      Motor2 = Motor2 - 127;

      //Command Motors
      ST.drive(Motor1);
      ST.turn(Motor2);

      /*
      Serial.print("[AN1 = ");
      Serial.print(rxPacket.analog1);
      Serial.print("]");

      Serial.print(" [Motor1 = ");
      Serial.print(Motor1);
      Serial.print("]");

      Serial.print(" [AN2 = ");
      Serial.print(rxPacket.analog2);
      Serial.print("]");

      Serial.print(" [Motor2 = ");
      Serial.print(Motor2);
      Serial.print("]");

      Serial.print(" [CHKSM = ");
      Serial.print(rxPacket.packetChecksum);
      Serial.print("] ");

      Serial.print(" [txPacket: ");
      Serial.print((unsigned long)data);
      Serial.println("]");

      Serial.println("Reply sent.");
      */

  }
}

#techthursday #RF #Joystick #Sabertooth


sir please give me full setup
i use this code but ‘Mirf’ does not name a type